
Soul Learning(2) Use Divide Plugin
The Divide plug-in uses
I. Initiation of the Project
Start the soul-bootstrap (9195) and soul-admin (9095) modules. We can see from the bootstrap configuration file that the two modules perform data synchronization through the Web Socket protocol:

You can also see from the bootstrap log:

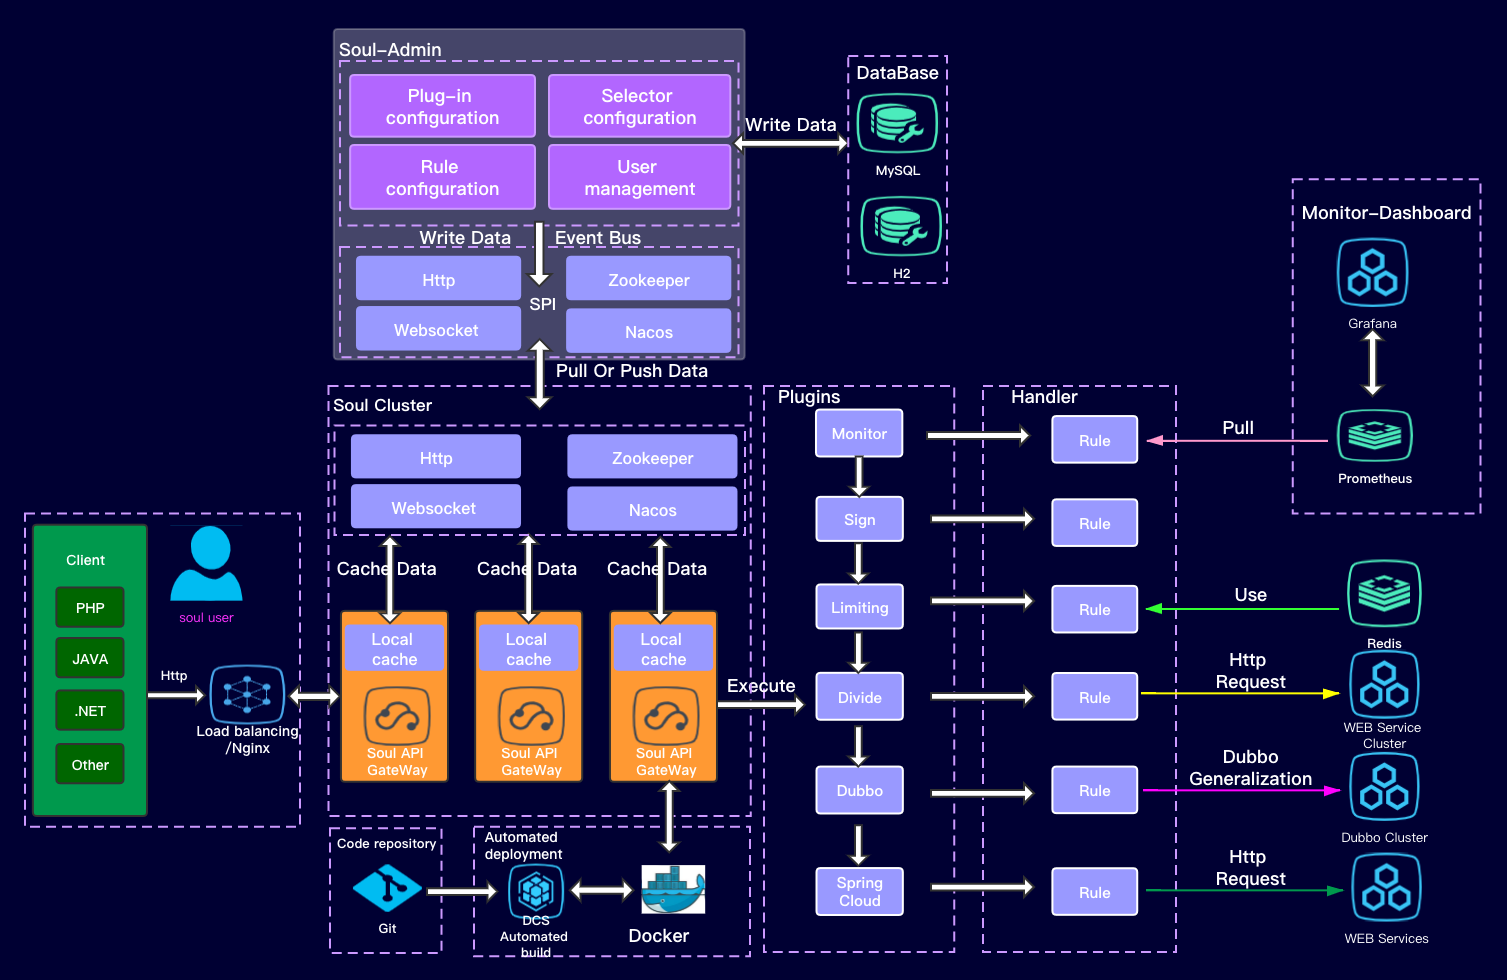
The so-called data synchronization refers to synchronizing the data configured in soul-admin to the JVM memory in the soul cluster, which is the key to the high performance of the gateway.
After we start the two projects, we can test the divide plug-in through the background management system.
II. Introduction to divide Plug-in
The divide plug-in is the core processing plug-in for the gateway to process HTTP protocol requests, and is also the only plug-in that is enabled by default:

We can imagine what the gateway does and guess what the divide plug-in might do to handle HTTP requests?
First of all, as a micro-service gateway, there must be a distributed micro-service cluster with multiple business lines behind it, and as a unified entrance to all services, the gateway must have the ability of traffic distribution/routing/load balancing, and the word divide, as its name implies, means distribution and distribution. So we can guess that the divide plug-in is to route and forward HTTP requests according to various rules, which is also the most basic capability of the gateway.
When we open the list of plug-ins on the management interface, we can see that all plug-ins are composed of two parts: ** Selector ** (selector) and ** Selector rule **.
The plug-in design idea is the core design idea of soul gateway, and the two concepts of selector and rule are also the soul of soul gateway. In theory, if we master it well, we can manage the traffic of any access gateway.
A plug-in has multiple selectors, and one selector corresponds to multiple rules. The selector is equivalent to the first screening of traffic, and the rule is the final screening.
Selector

* ** Name **: Give your selector an easily distinguishable name
* ** Type **: custom flow is a custom flow. Full flow is full flow. Custom traffic means that the request will follow your matching methods and conditions below. Full flow does not go.
* ** Match mode **: and or or means that the following multiple conditions are combined in the way of and or or.
* ** Condition **:
    * URI: It means that you filter traffic according to the way of URI, and the way of match supports fuzzy matching (/**)
    * Header: refers to filtering traffic based on the fields in the request header.
    * Query: refers to filtering traffic based on the query criteria of the URI.
    * IP: Refers to filtering traffic based on the real IP you request.
    * Host: refers to filtering traffic based on the real host you request.
    * Post: Not recommended.
    * Condition matching:
        * Match: Fuzzy matching, recommended and URI condition collocation, support restful style matching. (/test/**)
        * =: The preceding and following values must be equal to match.
        * RegEx: Regular match, which means that the previous value matches the following regular expression.
        * Like: string fuzzy match.
* ** Whether to open or not **: Open to take effect
* ** Print the log **: When opened, the match log is printed when a match is made.
* ** Order of execution **: When there are multiple selectors, the one with the smaller execution order is executed first.
Selector rule


As you can see, the configuration of rules is similar to that of selectors, which can be understood as a more fine-grained custom configuration.
III. Use of divide plug-in
Without further ado, let's just run the examples module provided by soul to demonstrate the divide plugin.

Notice that we ended up running the soul-examples-http module. The configuration file can use the default or customize the contextPath and appName, as shown in the figure above.
We need to note that the contextPath attribute is very important, which is equivalent to the namespace of all our HTTP requests, and the selector is aligned one by one. Generally speaking, we can configure a service to correspond to a contextPath, and multiple service instances configured with the same contextPath under a service will be automatically mapped to the same selector for load balancing.
After we start the process with port 8188, we can find that the selector and rule corresponding to this instance are automatically configured in the divide plug-in list of the management console:

You can see that the 8188 project address I started is automatically registered:

Test gateway routing
Test the forwarding without gateway through postman first:
http://localhost:8188/order/findById?id=1
Then test the forwarding to this interface through the gateway:
http://localhost:9195/my-http/order/findById?id=1
Looking at the log, we found that it was indeed forwarded to the 8188 interface address through the gateway:

Test load balancing
We change the port to 8189 and start the second process.

Note that IDEA needs to remove the restriction of Single instance only:

We enter the management console again and find that two configuration addresses appear under the my-http selector:

At this point, we continue to test and find that the load balancing strategy does work:

Today, I just demonstrated the most basic configuration of the divide plug-in, and there are various other rule configurations that can be tried later.